Calligraphy & Code: Designing the Soso Holiday Poster
Designing the annual Soso holiday card gives us a chance to cut loose and indulge in some creative experimentation. This year, we decided to illustrate one of our favorite Yogi Berra quotes on a poster in celebration of his legendary wit, wisdom, and wordsmithing. We love expressive typography, so we challenged ourselves to bring the hand-crafted flourish of lettering into the algorithmic world of programming. This post walks through the process of coding a set of holiday-themed brushes in Processing and using them to design a poster.
Most of the brushes began with snippets of code from “Getting Started with Processing” by Casey Reas & Ben Fry. The Processing sketches are available to download on Github.

The candy cane brush rotates a cross-section of candy cane as it draws to create the signature spiral. We created the candy cane cross-section graphic in svg format so that it can scale up or down without losing resolution. The candy svg rotates along the path drawn by the mouse.
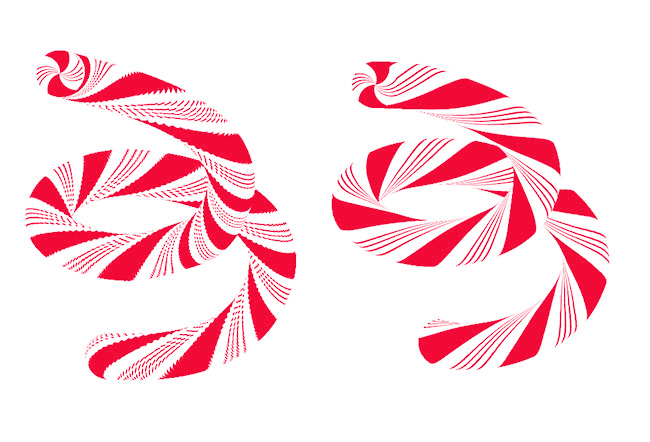
The initial code resulted in a very stepped and coarse stroke; drawing the candy svg once per frame was not nearly frequent enough to yield a smooth form. The lerp() function, or linear interpolation, solved that issue. Lerping draws a bunch of extra candy svgs between the mouse position at the previous frame and the mouse position at the current frame, smoothing out the stroke.
We optimized this brush specifically for use in calligraphy and lettering. Easing causes the brushstroke to lag behind the position of the cursor, creating more fluid motion. Linking the rotation of the candy cross-section to the cursor movement keeps the spiral even and consistent, no matter the speed of the brushstroke.

The ribbon brush is the simplest of the set. It is composed of two diagonal lines in slightly different shades of a color positioned next to one another. Drawing in one direction reveals color A and in the other reveals color B.

The fir tree brush looks complex, but has a simple foundation. At its core is a segmented line that forms the branch as you draw. Elongated ellipses, angled tangentially to the right and left of branch, serve as the needles. Adding some randomness to the needle color, length, and angle make the tree branch look more organic.

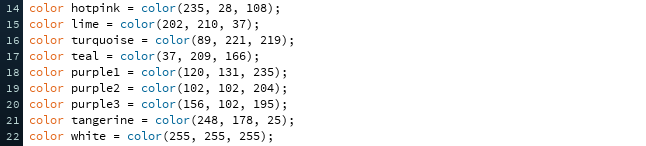
TIP: Code up your color palette to make it easy to swap out colors. We stored our color palette as color variables at the beginning of each sketch:
With the toolkit of holiday brushes assembled, it was time to bring everything together. We started by sketching out the poster design on paper, keeping in mind the character and quirks of each brush we planned to use.
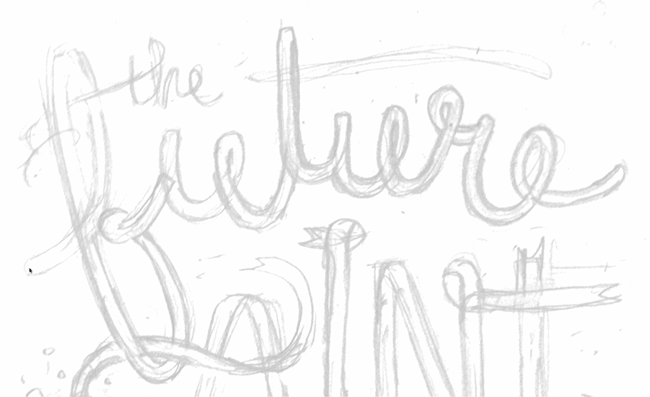
We scanned the drawing and placed it in the background of each Processing sketch as a guide. Using the sketch as a guide ensured that all the different pieces would fit together in the final composition.
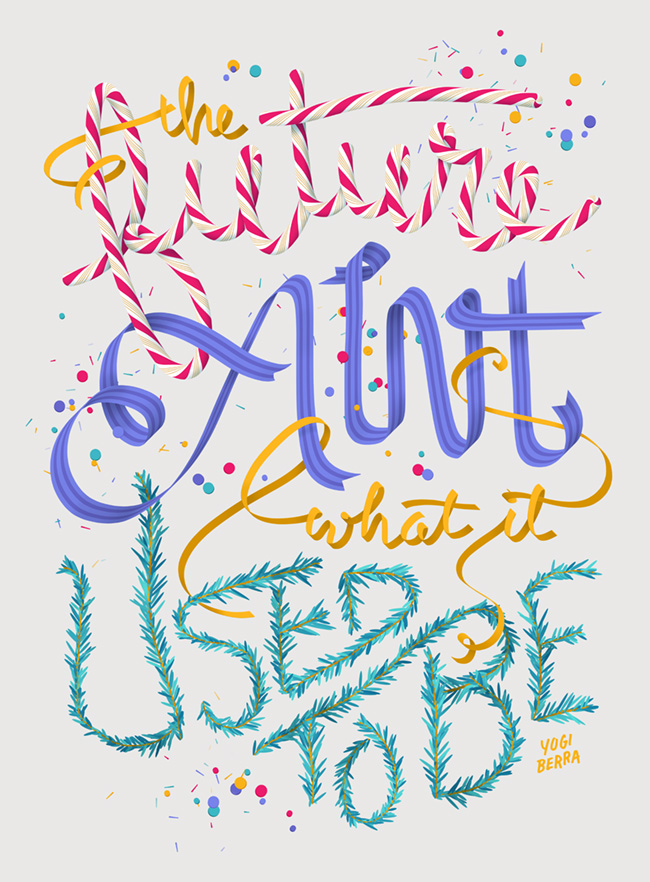
The images created in Processing needed to have super hi-resolution for poster printing. Exporting them in PDF format meant that all of the programmatic and vector-based elements in the sketches would remain scalable. We used the PDF Export library, putting the beginRecord() function after the image() function in the code so that the background image was not saved out in the pdf.

All of the separate pieces exported from the Processing sketches came together in Photoshop. Some programmatic confetti helped to draw the eye through the piece and a bit of manual shading added depth. Et violà!
Thanks for reading about our process. We hope you enjoy playing around with the Processing sketches. Happy New Year from the Sosos!